Thursday, April 9, 2015

March Beauty Favorites

I'm a little late, but better late than never. Here are my March beauty favorites.

I'll start with face products.

The Chanel Soleil Tan De Chanel is a beautiful subtle cream bronzer.  I've been using it all month long and what I love about it is that it's so natural-looking and easy to blend.  This will not settle into fine lines nor will it turn orange.  This bronzer scores bonus points because of how long this product lasts.  I've had it for close to 10 months now and it looks like I haven't touched it.  This is definitely worth every cent I paid.

Next up is the Becca blush in the color Gypsy.  This is a cool-tone baby pink, which is extremely pigmented and, in my opinion, pairs perfectly with so many Spring-inspired makeup looks.

Now for the eyeshadows:

This is the Bobbi Brown shadow in the color Champagne Quartz.  This is just one of those colors that is so universal in the sense that it can be paired with just about any other shade and will look absolutely gorgeous.

Another shadow I've been obsessed with this past month is the color Fawn M664 by MAKEUP FOREVER.  I've been pairing Fawn with Champage Quartz all month long and I love the color combination.

For some added fun and sparkle, I've been using the MAKEUP FOREVER shadow in the color Taupe Platinum D562.  This color has been my go-to all month for a smoky evening makeup look.

For lips, I have been loving the Too Faced Melted Lipstick in the color Melted Peony.  To me, it's the perfect pastel pink shade.


Last, but definitely not least, is the Gerard  Cosmetics lipgloss in the color Rose Hill. This picture just does not do this color justice.  I'm person, it is such a beautiful rose shade and the pigment is so intense that no other lip products are needed to achieve high pigmentation.  In general, Gerard Cosmetics lip glosses are all highly pigmented, feel very moisturizing on the lips without that sticky sensation, and last long on the lips.

Sunday, March 29, 2015

Pretty Pink Lips for Spring

Spring is officially here, although where I live feels like Spring decided to skip and go straight to Summer.

One of my favorite looks for lips during Spring is pink; I go back to it every year when the weather starts warming up.

My go to products lately for the perfect pink lips:
1. Line the lips with a nude Lipliner.  The one I used is Nude Beige by Burberry.  Any true nude will work.
2.  Fill the lips with a rosey shade.  I used Melted Peony by Too Faced, which is a dusty rose color and very pigmented. 
3. Finish off with a light layer of a sheer rosey gloss.  The one I used is the color 553 Princess by Dior.

And this is the final result.  I really love this lip combination.

Thursday, February 19, 2015

Beauty Oils: Friend or Foe?

After a short absence, I'm very excited to be back talking about beauty.  For the past few months, I've been branching out on skincare products and trying them myself.

Products I have really been loving lately are beauty oils.  Believe me when I say that any skin type can use them including those with oily skin.  As I've mentioned before, I have combination skin that tends to be on the drier side during the cold weather and quite oily during the hot weather.  Based on my experience and, of course, research I've done, I have come to the conclusion that beauty oils are very much a friend.


Some benefits:
1. For oily skin, you can combat oil with oil, making your skin less oily.
2. Oils nourish the skin, delaying signs of aging
3. Gives the skin such a glowy, radiant look and feel
4.  Will not settle into pores

My favorites are definitely the Josie Maran Argan Oil, Tarte Maracuja Oil, and the Boscia Tsubaki Beauty Oil.


I usually use the Tarte oil at night underneath my usual moisturizer and in the morning, my skin is baby soft.  This oil is a bit thick but I find that my skin easily absorbs it, even when it's oily.  


From time to time, I'll also use the Josie Maran oil at night only because it is also a thick oil and I saw that my makeup wore off super quick with this oil underneath.  Now, Josie Maran does have this oil in a light formulation, which I am yet to try.


During the day, I use the Boscia oil as it is thin enough to provide the right amount of moisture without compromising your makeup.  Plus, I love the scent.  Just to be clear though, this oil does not contain fragrance.

I also did give an oil by Fresh a try.  It is the Seaberry Face Oil, but I found that my skin did not take well to it, perhaps because this one does contain fragrance.  Other than that, the oil by Fresh is another awesome choice.

After months of using these oils, my skin has been so much softer, smoother, dark spots are brightening, and my makeup goes on so smoothly.  I would definitely recommend giving them a try.  Sephora has so many to choose from, depending on your skin's specific needs.

Tuesday, January 27, 2015

Quick Tip Tuesday

Lately I've been hearing more and more about the red lipstick trick for hiding under eye circles.  For those of you who don't know what I'm talking about, I'll explain.  Apparently, one of the most effective ways to conceal dark under eye circles is to apply a red lipstick.  But, does it work?

So, I went on a research hunt and trying many different ways to apply the lipstick to see how well it works.  This is what I came up with:

First, choose a red lipstick that has some orange undertones in it.  You do not want to use a cool-tone red, trust me!

Second, the application technique can vary, but I found the best way for me personally.

The play-by-play:
1.  With a clean face, I started with a facial primer, making sure to get it on the under eye area.
2. Using a large fluffy concealer brush (I used the Sephora Pro Airbrush Concealer brush) I applied the red lipstick.  I ran the brush through the lipstick, then applied it to my undereye.  Do not apply the lipstick from the bullet directly onto your undereye.  This will make it too intense and much harder to blend.  The brush will give you a softer application.
3.  I then applied my foundation and my usual lightweight undereye concealer as I would normally.

When applied properly, this is a pretty good trick.  I definitely saw a difference in the appearance of my pretty dark undereye circles.

Thursday, January 15, 2015

December Beauty Favorites

Throughout the month of December, I noticed using some products far more than anything else I own.  I tend to go through phases where I prefer certain colors over others.  This time, I gravitated much more towards the warmer colors.

Here are some of the beauty products I used the most:

Starting with lip products, the lip liner I wore non-stop throughout December was the NARS Velvet Lip Liner in the color El Agua:
Yes, this is a cooler tone of pinky purple, however, I added another product on top.
On top of El Agua I added NARS PureMatte Lipstick in the color Tonkin.  These two combined made a warm pinky purplish caramel color (well, I did my best trying to describe the color).  I just absolutely love the NARS Velvet Lip Liners because they literally last all day on the lips.
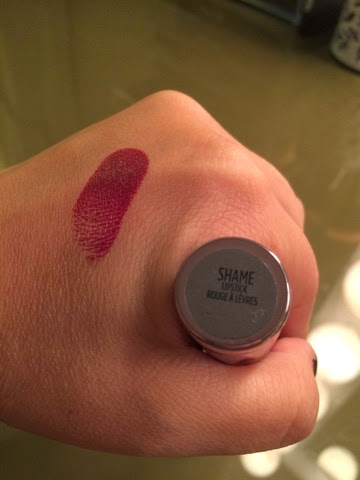
Next is the Urban Decay Revolution Lipstick in the color Shame.  I wore this throughout the holidays and was the perfect alternative to the traditional red.
An eyeshadow duo that was quite popular for me as an everyday look was this duo from BareMinerals in the color The 15 Minutes, which contains a pale pink called Page Six and a beautiful warm reddish brown called Most Requested (this picture does not do this color justice, in reality it is very pigmented with a slight shimmer).
Next up is an eyeshadow by Anastasia in the color Bengal.  I wore this on its own and received plenty of compliments.  This color is such a beautiful warm peachy brown with a very subtle hint of sparkle.
For evening looks, I used this Makeup Forever eyeshadow in M928, which is such a gorgeous matte eggplant color.  What I love about this color is that you can use with browns, pinks, purples, blacks (and I'm sure a few other color combinations) and this color just adds that perfect pop of color to your eyes.
Last, but not least, is this Bobbi Brown cream cheek product in the color Calypso Coral.  Corals I tend to use much more in the Spring and Summer, but I was on a warm kick this December.

Tuesday, December 30, 2014

Look Glowy this Winter

With Winter in full speed, I truly love to take advantage of my highlighting products.  The areas of the face commonly highlighted are the center of the forehead, the bridge of the nose, Cupid's bow, the center of the chin, and of course, the cheek bones.  When these areas are highlighted properly, the skin looks so healthy, glowy (I don't think that's even a word, but we'll make it work), and awake.

There are a number of products that can be used to achieve this glowy skin.  I've even used eye shadows as highlighters.  Below are some of my favorites:
From left to right: Bobbi Brown Rose, Bobbi Brown Sandstone, Becca Rose Gold, Becca Opal, and Burberry Golden Radiance.

Here are the swatches:
Bobbi Brown Rose - this is a very subtle rosy shimmer with a slight hint of gold sparkle

Bobbi Brown Sandstone - this is more of a beige-gold shimmer that is more intense than Rose and looks beautiful on all skin tones

Burberry Golden Radiance - this color is actually a bit darker than it shows up in the picture above and is less shimmery than the Bobbi Brown shimmer bricks.  This color is somewhat of a bronze shade that works better on darker skin tones.  My only complaint is that the fragrance on this product is strong and lingers for a long time.

Becca Opal - this color has a more yellow base and the shimmer is quite intense and so beautiful.  Again, this one will compliment all skin tones.

Becca Rose Gold - the name says it all.  This color is such a gorgeous rose gold that will looks amazing on all skin tones.

Last but certainly not least is a cream product.  This one is Giorgio Armani Fluid  Sheer in the color 2.  This is a very pale golden shimmery highlight that looks great on its own or can be applied under a powder highlight for a more dramatic effect.  This highlight is just absolutely gorgeous.  This one is quite pricey but worth every penny because a little goes a long way, which will last a very long time. I use mine almost everyday, I've had it for close to a year now, and it's still going strong.

Happy New Year!

Sunday, December 21, 2014

Favorite Bold Lip Products

There's no question that bold lips have definitely been in trend.  I have put together some of my favorite products for achieving the perfect bold lip.

Here are the swatches:
Chanel Rivoli - this color is more of a berry red shade perfect for the holidays as an alternative to the traditional red lip. Chanel products never seem to dissappint me.  This lipstick is a glossy finish, has great color payoff, and is very moisturizing.  This is such a beautiful shade and I really think it compliments every skin color.

NARS Audacious Lipstick in the color Liv - this color is a very deep blackened purple and it is absolutely beautiful.  These lipsticks by NARS are super creamy, pigmented, and long-lasting on the lips.  They have a satin finish.

Urban Decay Revolution Lipstick in Shame - this color is a dark berry color deeper than Chanel Rivoli, which is also beautiful for the holidays.  I find these lipsticks to have amazing color payoff and lasts long on the lips. The finish is a creamy sheen.

Bite Beauty High Pigment Pencil in Scarlet - this is a very dark rich red color with a matte finish and what I love about this brand is that they do not use synthetic ingredients.  Even though they are matte finish, I was surprised about how moisturizing these pencils are.

Kat Von D Studded Kiss Lipstick in Vampira (left) and Everlasting Liquid Lipstick in Vampira (right) - both of these colors are very deep burgundy shades and are matte finish.  Both are just gorgeous colors.  My favorite of the two definitely is the liquid lipstick.  The color payoff is just amazing and lasts all day, literally, on the lips.  Once this product is on, it's not going anywhere, whether you eat, drink, it stays put until you decide to take it off!

These are lip liners.  The one on the left is the NARS Velvet Lipliner in Lanikai, which is a reddened burgundy shade.  The one on the right is the Burberry Lip pencil in Oxblood which is more of a berry red.  Both have great color payoff.  However, I much prefer using the NARS pencil as is lasts much longer on the lips.  I wore one of these pencils to an office party and at the end of the day, it was still there!!

Happy holidays!

Tuesday, December 16, 2014

Homemade Lip Scrub

I have a wonderful, easy recipe for a homemade lip scrub.  Lip scrubs are used for exfoliating the lips, making them softer and smoother (which many of us want in order to be ready for those red lips we'll be sporting for the holidays).  For this recipe, I chose peppermint food flavoring which is perfect for the upcoming holidays.  You can, of course, use other flavors as well.

The ingredients:
1 tbsp. granulated sugar
2 drops of peppermint flavor
1 drop of red food coloring
1 tsp. coconut oil
 
The process:
Simple!!  Basically, mix all ingredients and store in a lidded container.  Mix carefully and do not over mix as this can dissolve the sugar.  I will usually add the sugar last, until the other ingredients are mixed together, in order to avoid over mixing the sugar.

Happy lip scrubbing!

Tuesday, December 2, 2014

Smooth Soft Lips for Winter

With Winter well on the way, I've started noticing my lips getting dryer and chapped.  Every time I notice my lips becoming chapped or just when I want smooth and hydrated lips, I go to my favorite technique to achieve this.

First, use a lip balm that tends to have a heavier texture.  Here are my go to favorites:
 Apply a thick layer to your lips and leave on for approximately five minutes.  Then, take a washcloth and gently rub your lips until the product has been completely removed.  Immediately, you'll notice that your lips feel much smoother and hydrated.

To exfoliate your lips, pick up some of your favorite balm with your finger, dip it into granulated sugar, and apply to your lips.  Again, leave it on your lips for about five minutes, then remove the product gently with a washcloth.

Lip scrubs are also amazing for exfoliating the lips.  I prefer to make the lip scrubs myself.  I will post a recipe for a fun lip scrub perfect for the holidays.  This post should be coming in the next few days.

Saturday, November 22, 2014

Oils for Healthy Hair

Lately, I've been doing lots of research about oils that help hair grow, helps hair be healthy, and those that help with hair growth.

I'm sure I'm not the only person overwhelmed and confused by the many oil options out there.  My personal issues are hair loss and damaged ends.  So, what does help?

I have found that all those oil options out there are not wrong or right.  Confusing? Ok, let me explain.  Based on my vast research, we each need to find what works for each of us personally.  For example, one person will find that coconut oil works very well for them but the next person will find that the oil is not working for them.

Here's what works for me.
I fill up a travel bottle with the two oils that have been helping my hair look healthier and grow.  I fill up half of the bottle with my base oil, which is the Castor Oil and the other half with Coconut oil.  I then massage about 2 quarter size amounts of the oils into my scalp 20 minutes before washing my hair.  This has been making a great difference in helping my hair look shinier and healthier.

Additionally, I have been using Jojoba Oil mixed with Rosemary Oil and I do see new hair growth, which is awesome!

Some other oils to consider mixing with the base oil, which will be either the Jojoba Oil or Castor Oil are:

Rosemary Oil
Thyme Oil
Rose hip Oil
Coconut Oil
Argan Oil

Again, find what works for you.  Based on my research, I would probably adhere to using 2 to 3 oils at most (too much is not good either).  I would strongly encourage seeking a medical professional prior to trying any of these oils just to rule out any possible physical problems that may be causing the hair loss.

Saturday, November 8, 2014

Recreation- Fall Makeup Look, MAC Humid and Bronze

Today I was playing with a few fall makeup look ideas and finally decided on recreating a look that TiffanyD created a few years back.  The look combines green and a bronze colors, which look beautiful together.

How I achieved this look:
1. Starting with a base, I used Makeup Forever Aquamatic Glide-On Eyeshadow in the color S-60.
2. I placed Makeup Geek's Peach Smoothie and Cocoa Bear on the crease.
3. I added a bit of Makeup Geek's Mocha on the outer V of my eye and along the lower lash line.
4. I then placed MAC Bronze on the outer half of my lid and MAC Humid on the inner part of my lid.
I finished off the look with black gel liner and mascara.

I really loved the way this look came together.  Again, this is a recreation of one of TiffanyD 's old fall tutorials.  She posted this tutorial on her YouTube channel, MakeupByTiffanyD.

Friday, October 31, 2014

Cute Scarecrow Makeup; Super Quick Last Minute Halloween Idea

This cute scarecrow makeup look literally took only minutes to achieve.  With this look, you can wear just about any eyeshadow combination of your choice.

The most notable part of this look is the stitches on both sides of the face and the patch effect on the nose.  To create the stitches and to outline the patch on the nose, I used a creamy black eyeliner.  I then used a bright pink eyeshadow to fill in the patch on my nose and to draw out the two circles on my cheeks.

The final steps, put on your favorite plaid shirt, some jeans ( if you don't have overalls) and a staw hat.  Voila!! Instant scarecrow!

This idea is by no means my original idea.  I was inspired by others who have done this.  This is just simply my version.

Thursday, October 23, 2014

At-Home Facial

Aside from my daily skin cleansing and moisturizing routine, I also treat myself to a facial.  But, what are the benefits of a facial?  According to my research, here are some benefits, although there are many others.  First, facials allow circulation of the blood under your skin leading to renewed skin cells making your skin softer and brighter.  Second, facials will allow you to clean pores thoroughly decreasing breakouts.  Third, a facial will aid i smoothing out fine lines to slow down the natural progression of aging ( who doesn't want this, am I right?).  Lastly, facials can aid in brightening skin tone and helps lighten dark spots.

The problem with facials is that they can be quite costly to have them done professionally.  Therefore, many of us don't have them done as often as we'd like.  Having a good facial done does not have to be a challenge to your wallet, especially if you do them at home.  Yes, we can have a good facial done at home as long as we have the right products (below are the products I use).


Here are the elements of a facial:
1.  Begin with washing your face with your favorite face wash.  Use warm water to open up the pores, allowing your face to gain the most benefits from the face wash.  Use a motorized brush to get the deepest clean possible.  I use the Clarisonic.
2.  Use a peel to boost skin radiance.  Peels are best to be used at night, as experts say skin does the most rejuvenating overnight.  I personally use the Ole Henriksen Lemon Strip Flash Peel.  This is a costly product, however, the product will last you long and is far less expensive than having a facial done by a professional.  Another good peel is the Philosophy Microdelivery Mini Peel Pads.  I realize these are expensive products.  But, isn't your skin worth the investment?  I certainly think so!
3. Following the peel, use a moisturizing mask to help your skin regain moisture lost from the peel as well as recover from the peel you used.  I use the SuddenChange Green Tea Facial Mask.  The good news, you can find this at a drug store.  Drug stores also carry other really great moisturizing masks.
4.  Once you rinse out the mask, apply an anti-aging moisturizer.  I use one by Neutrogena, which can also be found at a drug store.  If you have not used peels before, best if you use a moisturizer that does not contain Retinol in it as it may be too harsh on your skin.  Once your skin has adjusted to using a peel, you can go back to using Retinol.

I tend to do a facial one time per wee, but you can adjust this depending on your skin's needs.  A good rule to follow is to begin with one time per week, especially if you are new to peels.

I hope to have provided some useful information.  As always, many thanks for visiting my blog!

Friday, October 3, 2014

Younique Moodstruck 3D Fiber Lashes

Recently, I purchased the Younique 3D Fiber Lashes upon recommendation from a friend.  At first I was skeptical because they claim to add a 300% increase in both length and volume to your natural lashes.  If you're like me and prefer not to use false lashes frequently, this might be the product for you.  The product comes in a great and sturdy case that closely resembles an eyeglass case.  You get two products, the Moodstruck Transplanting Gel and the Natural Fibers.

The Natural Fibers are made of green tea, which will not harm your natural lashes.  So, here's how it works:
1. Apply your own favorite mascara and allow it to dry thoroughly.
2.  Apply the transplanting gel and then immediately apply the fibers.
3.  Apply another layer of the gel to straighten the fibers and set them.  Most importantly, be generous with this layer.  The fibers will not come off.
You can repeat these steps until you get the length and volume you wish, however just two layers are sufficient.

Here are my lashes before and after using the fibers:


I do find that they are long lasting throughout the day and wash off easily.  I love how much longer and thicker my lashes looked.  I definitely recommend this product; it quickly became one of my top 5 beauty must-haves.


Sunday, September 28, 2014

Healthy Skin Care Regimen

I've learned over the years, including through trial and error, that a good skin care routine is key to healthy skin, delay the process of aging, and help makeup look much more beautiful and long lasting.  Some basics to think about regardless of your skin type are:
1. Always use a sunscreen on your face including on cloudy days.  Experts say that the sun is strongest between 10:00 a.m. to 4:00 p.m., therefore, if sun exposure is unavoidable between these times make sure you have a sunscreen on.  Also, some say that an SFP15 will suffice.  I personally use a use an SPF50 during the Summer months.
2.  Use gentle cleansers.  Read the ingredients carefully and avoid products that contain alcohol.  Harsh cleansers will strip your skin of essential oils your skin needs, even if you have oily skin.
3.  Adapt a consistent skin care routine.  A healthy skin care routine often includes cleansing (pat your skin dry, do not scrub your skin dry), apply a serum that has antioxidants and/ or Vitamin C, and a moisturizer (again, even if you have oily skin).
4.  About 1 to 2 times per week, use a motorized brush to cleanse your skin.  Motorized brushes are much more effective than your fingertips at removing dead skin cells and removing makeup thoroughly.

My personal skin care routine for my combination type skin is:
1.  Morning - I begin with the Neutrogena Oil-Free Acne Wash, which contains the salicylic acid I need to address my acne prone skin.  Then, I use the Neutrogena Pore Refining Toner, which is gentle unlike other toners I've tried.  I follow with the Garnier Skin Renew Clinical Dark Spot Corrector.  Under my eyes I use the Neutrogena Healthy Skin Eye Cream, followed by Neutrogena Healthy Skin Anti-Wrinkle Cream SPF15.


2.  Night - I wash my face with the Neutrogena Fresh Foaming Cleanser.  This particular cleanser does such an amazing job at removing even the most stubborn makeup.  I follow with the same eye cream I use mornings and then use my Neutrogena Rapid Wrinkle Repair Moisturizer, which contains Retinol.  Retinol has been known even skin tone and provide a more radiant complexion.  As evidenced, I'm very fond of Neutrogena products.  I love them because they are relatively inexpensive and work well.  Also, they have a great variety of products to address every skin types' needs; they are amazing products.


3.  About 1 to 2 times per week, I use my Clarisonic for deep cleaning and follow with an at-home facial (blog about this to follow).

I hope this was helpful in establishing a skin care routine that suits your needs.  I have been following this routine for so many years and I promise, I have no large pores, my skin is smooth, healthy, and youthful.

Blogs to follow:
At Home Facial
Home-made Lip Scrubs

I am not sponsored by the produt companies mentioned.