Tuesday, January 27, 2015

Quick Tip Tuesday

Lately I've been hearing more and more about the red lipstick trick for hiding under eye circles.  For those of you who don't know what I'm talking about, I'll explain.  Apparently, one of the most effective ways to conceal dark under eye circles is to apply a red lipstick.  But, does it work?

So, I went on a research hunt and trying many different ways to apply the lipstick to see how well it works.  This is what I came up with:

First, choose a red lipstick that has some orange undertones in it.  You do not want to use a cool-tone red, trust me!

Second, the application technique can vary, but I found the best way for me personally.

The play-by-play:
1.  With a clean face, I started with a facial primer, making sure to get it on the under eye area.
2. Using a large fluffy concealer brush (I used the Sephora Pro Airbrush Concealer brush) I applied the red lipstick.  I ran the brush through the lipstick, then applied it to my undereye.  Do not apply the lipstick from the bullet directly onto your undereye.  This will make it too intense and much harder to blend.  The brush will give you a softer application.
3.  I then applied my foundation and my usual lightweight undereye concealer as I would normally.

When applied properly, this is a pretty good trick.  I definitely saw a difference in the appearance of my pretty dark undereye circles.

Thursday, January 15, 2015

December Beauty Favorites

Throughout the month of December, I noticed using some products far more than anything else I own.  I tend to go through phases where I prefer certain colors over others.  This time, I gravitated much more towards the warmer colors.

Here are some of the beauty products I used the most:

Starting with lip products, the lip liner I wore non-stop throughout December was the NARS Velvet Lip Liner in the color El Agua:
Yes, this is a cooler tone of pinky purple, however, I added another product on top.
On top of El Agua I added NARS PureMatte Lipstick in the color Tonkin.  These two combined made a warm pinky purplish caramel color (well, I did my best trying to describe the color).  I just absolutely love the NARS Velvet Lip Liners because they literally last all day on the lips.
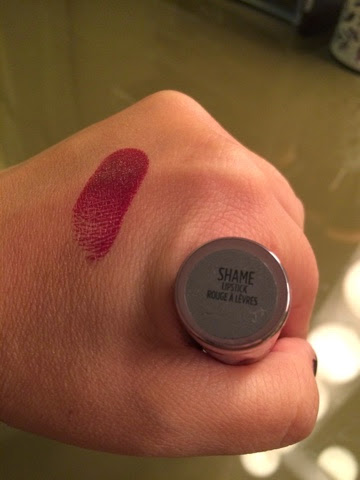
Next is the Urban Decay Revolution Lipstick in the color Shame.  I wore this throughout the holidays and was the perfect alternative to the traditional red.
An eyeshadow duo that was quite popular for me as an everyday look was this duo from BareMinerals in the color The 15 Minutes, which contains a pale pink called Page Six and a beautiful warm reddish brown called Most Requested (this picture does not do this color justice, in reality it is very pigmented with a slight shimmer).
Next up is an eyeshadow by Anastasia in the color Bengal.  I wore this on its own and received plenty of compliments.  This color is such a beautiful warm peachy brown with a very subtle hint of sparkle.
For evening looks, I used this Makeup Forever eyeshadow in M928, which is such a gorgeous matte eggplant color.  What I love about this color is that you can use with browns, pinks, purples, blacks (and I'm sure a few other color combinations) and this color just adds that perfect pop of color to your eyes.
Last, but not least, is this Bobbi Brown cream cheek product in the color Calypso Coral.  Corals I tend to use much more in the Spring and Summer, but I was on a warm kick this December.

Tuesday, December 30, 2014

Look Glowy this Winter

With Winter in full speed, I truly love to take advantage of my highlighting products.  The areas of the face commonly highlighted are the center of the forehead, the bridge of the nose, Cupid's bow, the center of the chin, and of course, the cheek bones.  When these areas are highlighted properly, the skin looks so healthy, glowy (I don't think that's even a word, but we'll make it work), and awake.

There are a number of products that can be used to achieve this glowy skin.  I've even used eye shadows as highlighters.  Below are some of my favorites:
From left to right: Bobbi Brown Rose, Bobbi Brown Sandstone, Becca Rose Gold, Becca Opal, and Burberry Golden Radiance.

Here are the swatches:
Bobbi Brown Rose - this is a very subtle rosy shimmer with a slight hint of gold sparkle

Bobbi Brown Sandstone - this is more of a beige-gold shimmer that is more intense than Rose and looks beautiful on all skin tones

Burberry Golden Radiance - this color is actually a bit darker than it shows up in the picture above and is less shimmery than the Bobbi Brown shimmer bricks.  This color is somewhat of a bronze shade that works better on darker skin tones.  My only complaint is that the fragrance on this product is strong and lingers for a long time.

Becca Opal - this color has a more yellow base and the shimmer is quite intense and so beautiful.  Again, this one will compliment all skin tones.

Becca Rose Gold - the name says it all.  This color is such a gorgeous rose gold that will looks amazing on all skin tones.

Last but certainly not least is a cream product.  This one is Giorgio Armani Fluid  Sheer in the color 2.  This is a very pale golden shimmery highlight that looks great on its own or can be applied under a powder highlight for a more dramatic effect.  This highlight is just absolutely gorgeous.  This one is quite pricey but worth every penny because a little goes a long way, which will last a very long time. I use mine almost everyday, I've had it for close to a year now, and it's still going strong.

Happy New Year!

Sunday, December 21, 2014

Favorite Bold Lip Products

There's no question that bold lips have definitely been in trend.  I have put together some of my favorite products for achieving the perfect bold lip.

Here are the swatches:
Chanel Rivoli - this color is more of a berry red shade perfect for the holidays as an alternative to the traditional red lip. Chanel products never seem to dissappint me.  This lipstick is a glossy finish, has great color payoff, and is very moisturizing.  This is such a beautiful shade and I really think it compliments every skin color.

NARS Audacious Lipstick in the color Liv - this color is a very deep blackened purple and it is absolutely beautiful.  These lipsticks by NARS are super creamy, pigmented, and long-lasting on the lips.  They have a satin finish.

Urban Decay Revolution Lipstick in Shame - this color is a dark berry color deeper than Chanel Rivoli, which is also beautiful for the holidays.  I find these lipsticks to have amazing color payoff and lasts long on the lips. The finish is a creamy sheen.

Bite Beauty High Pigment Pencil in Scarlet - this is a very dark rich red color with a matte finish and what I love about this brand is that they do not use synthetic ingredients.  Even though they are matte finish, I was surprised about how moisturizing these pencils are.

Kat Von D Studded Kiss Lipstick in Vampira (left) and Everlasting Liquid Lipstick in Vampira (right) - both of these colors are very deep burgundy shades and are matte finish.  Both are just gorgeous colors.  My favorite of the two definitely is the liquid lipstick.  The color payoff is just amazing and lasts all day, literally, on the lips.  Once this product is on, it's not going anywhere, whether you eat, drink, it stays put until you decide to take it off!

These are lip liners.  The one on the left is the NARS Velvet Lipliner in Lanikai, which is a reddened burgundy shade.  The one on the right is the Burberry Lip pencil in Oxblood which is more of a berry red.  Both have great color payoff.  However, I much prefer using the NARS pencil as is lasts much longer on the lips.  I wore one of these pencils to an office party and at the end of the day, it was still there!!

Happy holidays!

Tuesday, December 16, 2014

Homemade Lip Scrub

I have a wonderful, easy recipe for a homemade lip scrub.  Lip scrubs are used for exfoliating the lips, making them softer and smoother (which many of us want in order to be ready for those red lips we'll be sporting for the holidays).  For this recipe, I chose peppermint food flavoring which is perfect for the upcoming holidays.  You can, of course, use other flavors as well.

The ingredients:
1 tbsp. granulated sugar
2 drops of peppermint flavor
1 drop of red food coloring
1 tsp. coconut oil
 
The process:
Simple!!  Basically, mix all ingredients and store in a lidded container.  Mix carefully and do not over mix as this can dissolve the sugar.  I will usually add the sugar last, until the other ingredients are mixed together, in order to avoid over mixing the sugar.

Happy lip scrubbing!

Tuesday, December 2, 2014

Smooth Soft Lips for Winter

With Winter well on the way, I've started noticing my lips getting dryer and chapped.  Every time I notice my lips becoming chapped or just when I want smooth and hydrated lips, I go to my favorite technique to achieve this.

First, use a lip balm that tends to have a heavier texture.  Here are my go to favorites:
 Apply a thick layer to your lips and leave on for approximately five minutes.  Then, take a washcloth and gently rub your lips until the product has been completely removed.  Immediately, you'll notice that your lips feel much smoother and hydrated.

To exfoliate your lips, pick up some of your favorite balm with your finger, dip it into granulated sugar, and apply to your lips.  Again, leave it on your lips for about five minutes, then remove the product gently with a washcloth.

Lip scrubs are also amazing for exfoliating the lips.  I prefer to make the lip scrubs myself.  I will post a recipe for a fun lip scrub perfect for the holidays.  This post should be coming in the next few days.

Saturday, November 22, 2014

Oils for Healthy Hair

Lately, I've been doing lots of research about oils that help hair grow, helps hair be healthy, and those that help with hair growth.

I'm sure I'm not the only person overwhelmed and confused by the many oil options out there.  My personal issues are hair loss and damaged ends.  So, what does help?

I have found that all those oil options out there are not wrong or right.  Confusing? Ok, let me explain.  Based on my vast research, we each need to find what works for each of us personally.  For example, one person will find that coconut oil works very well for them but the next person will find that the oil is not working for them.

Here's what works for me.
I fill up a travel bottle with the two oils that have been helping my hair look healthier and grow.  I fill up half of the bottle with my base oil, which is the Castor Oil and the other half with Coconut oil.  I then massage about 2 quarter size amounts of the oils into my scalp 20 minutes before washing my hair.  This has been making a great difference in helping my hair look shinier and healthier.

Additionally, I have been using Jojoba Oil mixed with Rosemary Oil and I do see new hair growth, which is awesome!

Some other oils to consider mixing with the base oil, which will be either the Jojoba Oil or Castor Oil are:

Rosemary Oil
Thyme Oil
Rose hip Oil
Coconut Oil
Argan Oil

Again, find what works for you.  Based on my research, I would probably adhere to using 2 to 3 oils at most (too much is not good either).  I would strongly encourage seeking a medical professional prior to trying any of these oils just to rule out any possible physical problems that may be causing the hair loss.